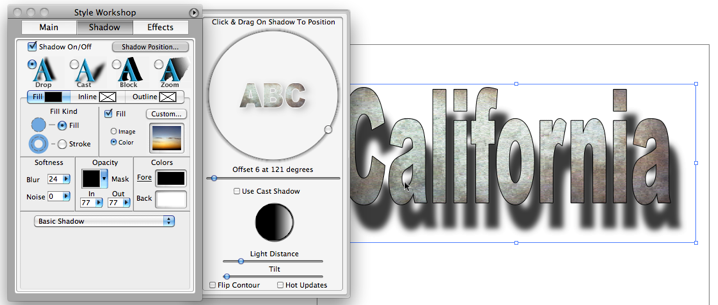
| Drop Shadows A drop shadow is a single shadow the same size as the main object. By default, when Drop Shadow is selected, TypeStyler applies a 25% blur and an opacity of 77 to the shadow resulting in a "soft" drop shadow. When working with shadow fills, the Standard Fill, Graduated Fill, Starburst Fill, Dual Blend Fill, and Image Fill choices can be applied to a drop shadow. You adjust the placement of a shadow by click on the Shadow Position… button to access the Shadow Position drawer. With drawer open the shadow of your object now becomes adjustable on your work area and you can click and drag the shadow to adjust its position. Note: As a shortcut you can adjust the shadow position of an object without entering the Style Workshop by holding the "S" key and clicking and dragging the shadow of your object.  To change the color of a shadow make sure that you have the object you want to change selected and in the Style Workshop the Shadow tab is selected. Next choose either Fill, Inline or Outline. When either Fill, Inline or Outline are selected there is also a corresponding checkbox that needs to be checked. The checkbox allows you to quickly turn on or off the Fill, Inline or Outline. When you click on the on Fore rectangle the Colors panel will open. Choose a color from any of the installed Color Pickers. Your selected object in the Main window will change to the new color.  Under the heading "Fill Kind" there 2 choices. When Fill is selected, the object is filled with the current color or image that is selected. When Stroke is selected the object is outlined in the current color or image that is selected  The Softness area has 2 popup slider controls. The first one controls the Blur. Blur works by softening the hard edges of the object and to smooth out the transition between 2 colors. The Noise slider allows you to add interesting texture effects similar to that of a bad television signal.  Fill Opacity is used to set the overall transparency of the selected object. You can also add an Opacity Mask to your object by choosing one of the predefined opacity masks from the Mask palette or by using the either of the Fill Opacity sliders. The In and Out sliders control the object's transparency based on the values of black and white in the mask with white being visible and black being transparent.  Outlines and Inlines Both outlines and inlines are drawn around the outside boundaries of the characters in an object. The inner line is called the Inline and the outer line is called the Outline. If you make them the same color, the result looks like a fat outline (this is also determined by the line weight; see “Line Width Slider” below). If you make them different colors, or patterns, you can create many effects. A white inline with a black outline, for example, can create a formal or classic look. If you only want a single line around a type character, you can use either an inline or an outline, and the result will look the same. To create either an Inline or Outline, select Inline or Outline and and make sure that Inline or Outline checkbox is checked. The same fill options are used for the main object, shadow, inline, and outline. The current inline or outline fill is displayed in the box next to Inline or Outline. The current fill color, image or pattern is highlighted in the appropriate palette. Unchecking either the Inline or Outline checkbox turns off the existing inline or outline. Note: Shadows with Three-D Block fills cannot be inlined or outlined. Use the Zoom Effect option to create block inline, outline effects. When either Inline or Outline are selected, a line width slider appears near the bottom of the Style Workshop. The line width slider gives you choices of line widths, ranging from a hairline (one point or pixel wide) to a line forty points thick.  When either Inline or Outline are selected, a line width slider appears near the bottom of the Style Workshop. The line width slider gives you choices of line widths, ranging from a hairline (one point or pixel wide) to a line forty points thick. |